Today we had 13 members coming and going throughout the day. Four comfort quilts were pin basted, one of which was quilted and had binding applied, thank you Lynn, for the quilting and Susan for the piecing. Another was put under the quilting needle by Sandra S. She spent the better part of the day doing free motion quilting. One of the final two is a bit larger than the others. It is a flannel Five and Dime pattern with the blocks being pieced by Judy and joined by Susan, then Marg F. pieced the flannel backing and finally it was pin basted by a group of our members and will be longarmed by Heather. The fabrics came from Marg H’s stash. A truly collaborative effort! That leaves only one to be taken home and quilted.
Sandra is contemplating her next pattern for free motion.
Susan is sorting and matching fabrics for more quilt tops.

Here we see the group of members working on pinning the Five and Dime quilt.
Comfort Quilts:
This quilt was pieced by Sandra D. and Rae, then quilted by Heather. Rae and Sandra get together on Wednesdays and work on comfort quilts. This one was made from a cloth book panel. The pages are meant to be backed with batting, then joined to make a child’s soft book. They separated the pages and put them together with sashing to make a story quilt. The trickiest part was assuring that the pages were in order! This quilt with its soft purple is meant for a little girl.
And the little boys are not forgotten! This story panel of dinosaurs was made for a boy. The pantograph Heather chose is called Crisscross Applesauce. You can see how the lines of quilting switch from vertical to horizontal.
This is the Plus Pop top put together from the blocks that members stitched. The yellow binding finishes it very nicely.
This small hanging/table topper was pieced and appliquéd by Marg H. and was quilted and bound by Donna. Very attractive!
This happy quilt was pieced by Susan and quilted and bound by Lynn.

Marg used painter’s tape to mark this quilt. By stitching down both sides of the tape you can add eye pleasing appeal to a simple grid quilting pattern. The fabrics have different textures.
Another simple pattern both in piecing and quilting results in a very attractive child’s quilt.
We now have twenty-two comfort quilts, one Quilt of Valour and three Hug Me quilts in the buckets.
Rae reported on her delivery of the Quilt of Valour to Jack Larson for his 99th birthday. He was very pleased to receive it and replied, “Thank you everyone for coming and I’ll try to hang on till next year so you can come to my 100th”.
We were given a preview of our Fall Raffle quilt. The pattern is called Butter Tarts and was written by Kathy and Lori of Highway 10 Designs. The fabrics for the top were chosen from the stash of Marg H.
This will be a beautiful quilt for someone to win.
Show and Tell:
Marg stitched this beautiful hanging from a kit she had in her store. The flowers are three dimensional and add depth to the pattern. Beautiful, Marg! She had another similar hanging but I neglected to get a photograph as she had it already hung as part of our decor for the hall. I will do my best to remember to take a photo at our next meting. My apologies, Marg.
This quilt by Marg is a beautiful example of English Paper Piecing. It is all hand quilted.
Marg crocheted this Temperature quilt. The colours for a temperature quilt are chosen to represent the daily highs for a period of time, usually a year. With crochet it would involve a lot of colour changes!
This flimsy is one Marg constructed from the crumbs of another temperature quilt she was working on. No fabric bits go to waste!

Marg’s final piece was quilting of a different sort. While spending her winters in Arizona she spends a lot of time in the woodworking shop at their park. This bowl has an attic window pattern on it, which is of course a quilting pattern, the woods she used were wenge, oak, walnut, sepia and maple.
This is Heather’s completed retreat project. The quilt pattern is called Bear Camp and she quilted it with a pin stripes quilting pattern.
This table topper is one Heather made from orphan blocks she had. The topper will be used at her workplace.
Zoey completed this quilt for her younger brother whose favourite colour is orange.
This quilt has a lot of triangles! Zoey did a lovely job of colour gradation from light to dark. Very well done, Zoey!
The last show and tell was Rae and search as I might I could not locate the photos! Perhaps I am losing more than just photos. Again, my apologies. My notes tell me she made two little doll blankets for a little girl to whom she gifted a larger quilt. I will see if I can get a photo.
Sandra made some pillow shams from the leftover bits and pieces from the memory quilts she made for her sister. She credits her no waste, Mennonite background with the idea of making the shams from the pieces that were left.
This quilt was Sandra’s entry in the Northern Juried Art Show. It was a recreation of family lore passed down over the years.In 1958 in Paraguay, a bolt of lightning struck a tree, her dad, and a cow. Her dad was the only survivor. Her quilt beautifully depicts the story.
Demonstration:
Marg demonstrated the 6-Hour Quilt to us. This is a quick and easy way to put together a quilt, small or large , and use up scraps of fabric, batting, polar fleece or whatever.
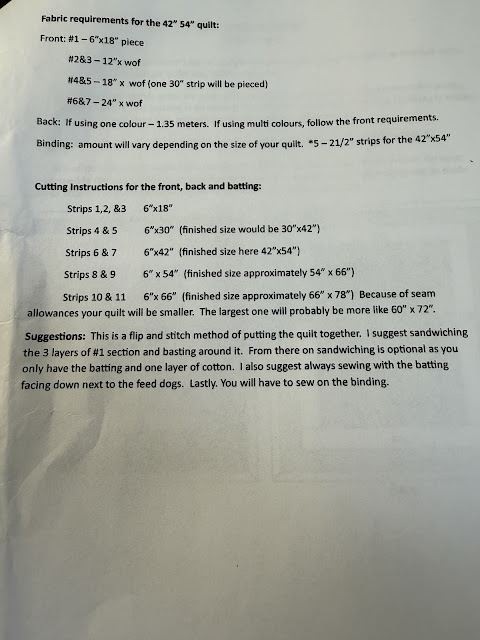
This comfort quilt that Marg donated was made using the 6-Hour method. I will add the instructions she shared with us. Thank you for the pattern.
Quilter’s Corner:
In tonight’s quilter’s corner, I shared the method I used to put a scalloped border on my bird quilt.
This border was made using the Creative Grids Scallop Template. As you can see, the border has a waved edge rather than what I call a “bumped” edge. This is a fairly easy to use ruler and has deeper waves also. Keep in mind that when using a scalloped border your binding must be cut on the bias so it will curve neatly on the wavy edges. Once you have a measurement of the edges there is a chart telling you how big a square of fabric is needed to cut the amount of continuous bias binding you need.
If you decide to purchase the ruler, there is a very good set of instructions with it that tells you exactly what you have to do to get your border completed.
This particular post took a long time to complete what with wildfire evacuations and all the ensuing confusion. Hopefully our summer will be uneventful!
Welcome back everyone and Happy Quilting!


No comments:
Post a Comment